Yummy strawberry jam...how do I love thee. There is nothing quite like homemade strawberry jam. Really. Cracking open the jar. The sweet scent of strawberries and sugar. After our euphoric trip strawberry picking last week I decided to try my hand at strawberry jam making.
I clearly remember standing in my kitchen as a child, watching my mom make strawberry jam. In fact, my mom made peach jam too! I remember the day like it was yesterday, the day my mom set the stove on fire as strawberry jam oozed over the top of the pot and spilled it's way on to the floor...reminded me of red hot lava. Yes, there were flames and some swearing. Somehow my mom managed to put the flames out, regain her poise (ha!) and jar the jam. So, you might wonder with that memory burned in my brain why would I dare attempt this task? Good question.
Helpful Strawberry Jam Making Tips
I won't take you through the steps of how to make strawberry jam...look here for that. What I will provide you with are some tips...words from someone who went into the trenches and lived to tell the tale. True, days after finishing when I popped open my first jar of jam and smelled the heavenly scent...I quickly realized that my foray into jam making had failed. As my knife poked the surface of the ruby liquid...it was too much liquid, not enough jam. My husband assured me it will make lovely syrup for ice cream (more on how to recover from this runny result later). On with the tips.
Jars in the oven

Sterilization is the key to canning anything. There are a couple of ways to sterilize the jars. You can wash your jars in your dishwasher, on the sanitize cycle, and then keep them in your hot dishwasher until you are ready to fill them. Or, you can wash the jars in soapy water and sterilize them in a pot of boiling water for 10 minutes. Once your jars are sterile, store them on a baking sheet inside a warm oven (200F). This tip came from my friend Jenn and it worked like a charm - the glasses were dry, warm and sterile.
Work stations are your friend

Being organized is really important in canning. Work stations are your friend. A few work stations you will need are (a) strawberry prep area (b) strawberry cooking area (c) sterilization area/jar washing area (d) canning area (e) jar storage area. With these areas planned out ahead of time there is no need to panic when you have hot glass jars filled with bubbling strawberry jam goodness.
Check the instructions provided and then double check
If you are using store bought pectin, take advantage of the recipe for jams and jellies inside the package. The pectin manufacturers are not new to jam making...they know what they are doing. If this is your first time - follow a tried and true recipe.
Potato masher or strawberry masher?

When it comes time to mash down the strawberries, use your potato masher. If you like a smooth jam, you will have to use a food mill or food processor. Otherwise, it is easy to breakdown the berries with your standard potato masher.
Make sure the jam has set...before jarring
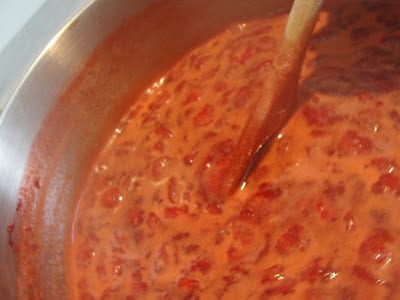
Ahh, this is where it all went wrong for me. This is also the step when my mom almost burned the house down. Relax and have some patience with the jam. Once it starts to boil...make sure it is set - before you transfer to the jars. You can do this by dipping a tablespoon into the liquid, turn the spoon over and run your finger along the back of the spoon. If your finger leaves a clean line (the jam doesn't fill in the line) then you are ready to jar your jam.
Try, try again
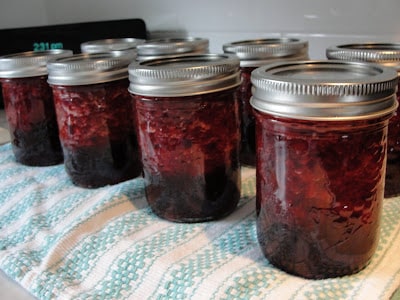
If, despite your best efforts, you make jars filled with strawberry sauce and not jam...don't despair. Dump the sauce back into a pot, re-sterilize the jars (replace the lid disks they are a one-time use item) re-boil the sauce and this time make sure it sets...done. This may seem like a major effort, but it is well worth the end result.
Hopefully, these tips will help you make beautiful jars of jam. After a couple of hours of hard work, you can sit back and enjoy your toast - with homemade strawberry jam - all year long!